If you are managing other servers, and are not exporting those server logs somewhere else, then you really should consider doing so. I won’t try to make the case for why in this blog post. You can do your own research (this might be a good place to start).
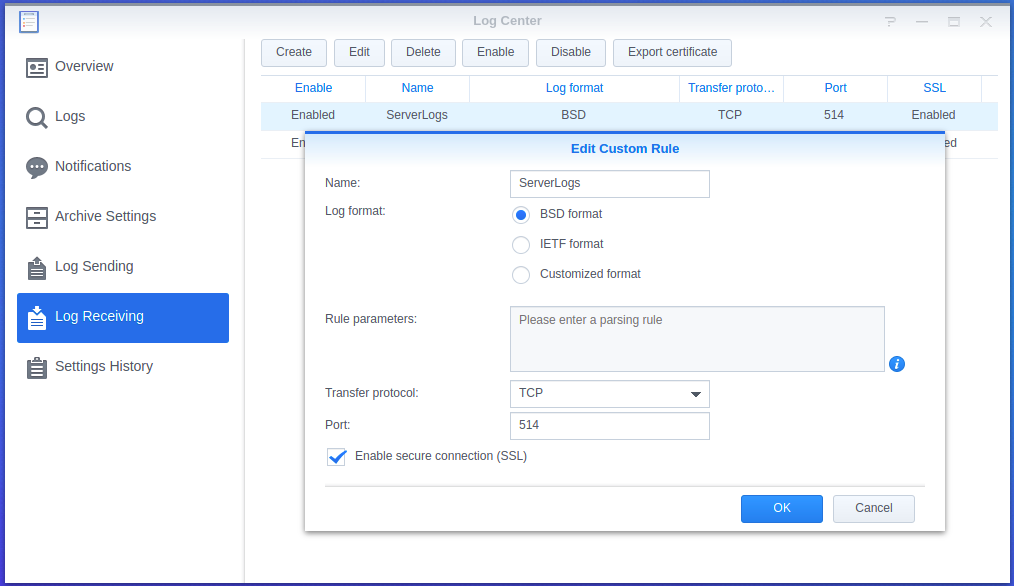
Click this screenshot of Synology’s Log Center to enlarge
Synology’s Log Center package can be used as a central log collector for other servers. It is certainly not elegant, it is simple, and it doesn’t have very many features. But it is easy and fast to implement, and is definitely better than not centralizing your logs at all.
Here are steps to configure CentOS 7 to securely send its log data to Synology’s Log Center package:
Prerequisites
- Ensure that the firewall where your Synology is located has NAT enabled for TCP/514 to send that traffic to your Synology (you do have a firewall, right? Never, ever connect your Synology directly to the internet).
Steps to perform on the Synology:
- Install the “Log Center” package using Synology’s Package Manager. The default log center in DSM is very limited. You’ll need the extra features that the Log Center “add-on” package provides.
- Open the Log Center package, and click on “Log Receiving”
- Click Create
- Give your Logging Rule a name. It can be anything (mine is named “ServerLogs”)
- The Log Format should be set to BSD
- Transfer Protocol should be changed to TCP
- The Default Port for syslog traffic is 514, but you can change the port to something else if you want, as long as you remember to set the correct port on the CentOS server (rsyslog client)
- Check the checkbox to Enable secure connection (SSL)
- Click OK
- Click the “Export Certificate” tab inside Log Center (see above screenshot, the tab is far right) and save the CA file somewhere. You’ll need to upload this to the CentOS server in a later step.
Steps to perform on the CentOS 7 Server (rsyslog client):
- Ensure port TCP/514 is open (incoming and outgoing). CentOS 7 uses firewalld, and if that is enabled, you can run:
$ firewall-cmd --permanent --add-port=514/tcp
- Upload the CA file you saved in step 10 above into /etc/ssl/certs/synology-ca.crt
- Ensure rsyslog-gnutls is installed
$ yum install rsyslog-gnutls
- Edit /etc/rsyslog.conf and add the following lines to the bottom of the file:
$DefaultNetstreamDriver gtls # use gtls netstream driver
$ActionSendStreamDriverMode 1 # require TLS for the connection
$ActionSendStreamDriverAuthMode anon # server is NOT authenticated
$DefaultNetstreamDriverCAFile /etc/ssl/certs/synology-ca.crt
*.* @@Your-Synology-IP-Address:514
- Restart rsyslog:
systemctl restart rsyslog
You’re done!
If your CentOS server ever gets hacked, or if you want to review logs from your CentOS server without having to SSH into it, you can now review those logs using Synology Log Center.
I hope that this was helpful. Visit https://barredowlweb.com/knowledge-base/#Synology to view several other how-to tutorials that I’ve created for Synology users.